Table of Contents
Bloody Red Velvet Cake Pops
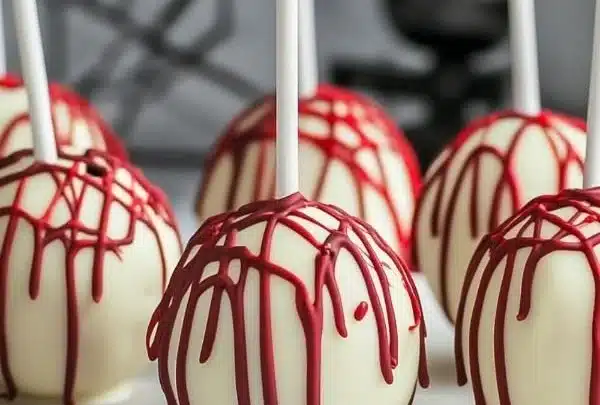
Hey there, friend! Today, I’m super excited to share my delightful Bloody Red Velvet Cake Pops recipe with you. If you’re anything like me, you love desserts that not only taste amazing but also look absolutely stunning. These cake pops are perfect for Halloween parties, birthdays, or just a fun treat for yourself. They’re so moist and fluffy, and honestly, the vibrant color makes them irresistible. Let’s dive into this fun baking adventure together!
What Is Bloody Red Velvet Cake Pops?
So, what’s the deal with Bloody Red Velvet Cake Pops? They’re essentially bite-sized treats made from red velvet cake mixed with cream cheese frosting and coated in chocolate. It’s like having a mini party in your mouth! The red color adds a dramatic flair, making them ideal for any gathering. Cake pops are a fantastic way to enjoy cake on a stick, and they make great gifts too!
Ingredients Overview for Bloody Red Velvet Cake Pops
Here’s what you’ll need to whip up these scrumptious treats:
-
Red Velvet Cake Mix: This is your base. You can use a box mix for convenience or make your own from scratch if you’re feeling adventurous.
-
Eggs: Required for the cake mix; they add moisture and richness.
-
Vegetable Oil: Gives the cake a soft, tender crumb. You can swap this with melted coconut oil or applesauce for a lighter version.
-
Buttermilk: This adds a lovely tang and helps the cake become fluffy. If you don’t have any on hand, mix regular milk with a teaspoon of vinegar as a quick substitute.
-
Cream Cheese Frosting: You can either buy this pre-made or whip up your own. The frosting helps bind the cake crumbs together.
-
Chocolate Coating: Use chocolate chips or candy melts. They create a delicious shell on the outside. You could use white chocolate too, but don’t forget to tint it for some extra Halloween fun!
-
Sprinkles or Edible Glitter (optional): Because who doesn’t love a little sparkle?
Step-by-Step Instructions to Make Bloody Red Velvet Cake Pops
-
Bake the Cake: Preheat your oven to 350°F (175°C). Prepare your cake mix according to the package instructions. Bake the cake in a round pan until a toothpick comes out clean. Let it cool completely.
-
Crumble the Cake: Take the cooled cake and crumble it into a large mixing bowl. It should resemble fine crumbs.
-
Mix in Frosting: Add about half a cup of cream cheese frosting to the crumbled cake. Mix until it’s combined well and feels like dough. You want it to be moldable, so add a bit more frosting if necessary.
-
Shape the Pops: Use your hands to roll the mixture into small balls, about the size of a tablespoon. Place them on a baking sheet lined with parchment paper.
-
Chill the Balls: Pop the sheet into the fridge for about 30 minutes, or until they’re firm.
-
Melt the Coating: While the cake pops are chilling, melt your chocolate or candy melts according to package instructions. Dip the end of a lollipop stick into the melted chocolate before inserting it into a cake ball. This helps keep the stick from falling out.
-
Coat the Cake Pops: Once the sticks are in, dip each cake ball into the melted chocolate, making sure they’re fully coated. Let any excess chocolate drip off.
-
Add Sprinkles: Before the chocolate hardens, sprinkle on your edible decorations for that festive touch.
-
Set to Dry: Stick the cake pops into a block of Styrofoam or a cake pop stand to let them set.
Serving Suggestions
Once your Bloody Red Velvet Cake Pops are ready, they can be served on a festive platter, perfect for impressing your friends. They’re great for parties, classroom treats, or just because you’re in the mood for a sweet snack. Pair them with a glass of milk or a cup of piping hot cocoa for a cozy feel.
Tips For The Perfect Bloody Red Velvet Cake Pops
-
Don’t Overbake: Keep an eye on your cake while it’s baking. Overbaking can lead to dry cake pops.
-
Adjust the Frosting: If the mixture feels too crumbly, add more frosting a tablespoon at a time until it’s right.
-
Chill Time: Don’t skip the chilling step. It helps the pops hold their shape during dipping.
-
Color Your Coating: For a fun Halloween vibe, consider adding gel food coloring to the melted white chocolate to make it extra spooky!
Q&A Section
1. Can I use a different cake flavor?
Absolutely! Feel free to experiment with different cake mixes, like chocolate or vanilla.
2. How do I store these cake pops?
Keep them in an airtight container in the fridge. They’ll last for about a week.
3. Can I make these in advance?
Yes, you can make the cake balls and store them in the freezer until you’re ready to coat them.
4. What if I don’t like cream cheese frosting?
You can use buttercream or any frosting flavor you love to bind the cake.
Why You’ll Love It
You’re going to adore these Bloody Red Velvet Cake Pops! They’re not just about looks; they deliver on taste too. The combination of moist red velvet cake and creamy frosting encased in a chocolate shell creates a delightful treat that’s hard to resist. Plus, they’re so fun to make! Your friends and family will be wowed by your creativity and the delicious flavors.
Behind The Scenes
Developing this Bloody Red Velvet Cake Pops recipe was a journey. At first, I had a hiccup with the chocolate coating melting too fast, which led to some gloppy pops. I also learned the hard way that chilling the cake mixture isn’t just a suggestion; it’s a must! After a few tweaks, I finally got it just right. It was so rewarding to see each pop come together beautifully. If you’re inspired, check out my Pinterest pages for more tasty ideas: MyRecipeCast.
I can’t wait for you to try making these! Share your experiences with me; I’d love to hear how they turn out. Happy baking!
Bloody Red Velvet Cake Pops
Ingredients
For the Cake
- 1 box Red Velvet Cake Mix Can be homemade or store-bought.
- 2 large Eggs Adds moisture and richness.
- 1/2 cup Vegetable Oil Can swap with melted coconut oil or applesauce.
- 1 cup Buttermilk Mix regular milk with vinegar for a substitute.
For the Coating
- 1 cup Chocolate Coating Use chocolate chips or candy melts, can color white chocolate.
- 1/2 cup Cream Cheese Frosting Can be store-bought or homemade.
- 1/4 cup Sprinkles or Edible Glitter For decoration, optional.
Instructions
Preparation
- Preheat your oven to 350°F (175°C). Prepare the cake mix according to package instructions and bake in a round pan until a toothpick comes out clean. Let cool completely.
- Crumble the cooled cake into a large mixing bowl until it resembles fine crumbs.
- Add about 1/2 cup of cream cheese frosting to the crumbled cake and mix until combined well and moldable.
- Roll the mixture into small balls, about the size of a tablespoon, and place on a baking sheet lined with parchment paper.
- Chill the balls in the fridge for about 30 minutes until firm.
Coating
- Melt the chocolate or candy melts according to package instructions.
- Dip the end of a lollipop stick into melted chocolate before inserting it into a cake ball.
- Dip each cake ball into the melted chocolate, ensuring they are fully coated, and let excess chocolate drip off.
- Before the chocolate hardens, sprinkle on decorations for a festive touch.
- Stick the cake pops into a block of Styrofoam or a cake pop stand to let set.