Snowman Cake Pops: A Sweet Winter Treat
There’s something magical about winter, isn’t there? Especially when it comes to desserts like Snowman Cake Pops! These adorable little treats are not only a hit at holiday gatherings, but they are also super fun to make. Imagine gathering around the kitchen, embracing the holiday spirit while getting your hands a little messy with frosting and decorations. Trust me, making Snowman Cake Pops is an experience you won’t forget!
Table of Contents
What Are Snowman Cake Pops?
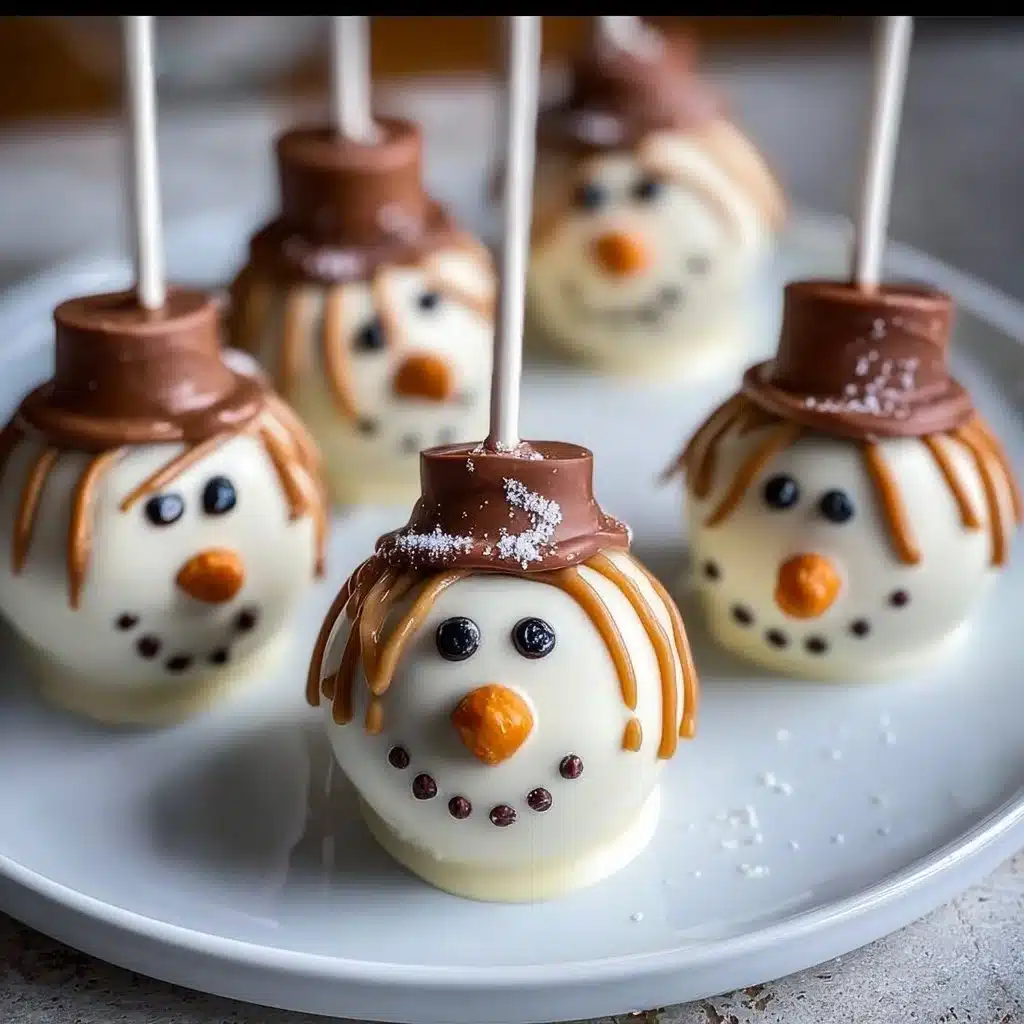
Snowman Cake Pops are delightful little cakes formed into the shape of snowmen, coated in chocolate or candy melts, and adorned with fun decorations! They’re perfect for holiday parties, family gatherings, or just a cozy night in. These bite-sized treats pack a lot of flavors and are surprisingly easy to create, even if you’re not a pro in the kitchen. Plus, the kids will love getting involved, making it a fun activity you can all do together. What’s not to love about a treat that spreads joy and sweetness?
Ingredients Overview for Snowman Cake Pops
Before diving into the fun part, let’s gather all the goodies we’ll need to create these adorable Snowman Cake Pops!
- Cake Mix: Any flavor you love! Vanilla or chocolate are classic choices. You can even use a homemade cake recipe if you’re feeling adventurous.
- Eggs: These bind everything together. If you want to keep it egg-free, you can use unsweetened applesauce or a flax egg as a substitute.
- Frosting: Use store-bought for convenience, but if you prefer to whip some up at home, go for it! Cream cheese frosting works wonders too.
- Candy Melts: White chocolate or vanilla candy melts are ideal for that snowy look.
- Lollipop Sticks: These will help you assemble your snowmen. You can find them at craft stores, or use sturdy straws as a fun alternative.
- Decorations: Get creative! Mini chocolate chips for eyes, orange candy bits for noses, and decorative sugar or sprinkles for a little flair.
Step-by-Step Instructions for Snowman Cake Pops
- Bake the Cake: Prepare the cake mix according to package instructions or your homemade recipe. Once it’s baked, let it cool completely on a wire rack.
- Crumble the Cake: Once the cake has cooled, crumble it in a large bowl until it resembles fine crumbs.
- Mix in Frosting: Add a generous amount of frosting (about a cup) to the cake crumbs. Mix with your hands until combined. It should be moist but not overly sticky.
- Form Snowman Bodies: Roll the mixture into small balls. Make sure to create a larger bottom ball and a smaller one for the head, just like a real snowman. Use lollipop sticks to hold them together.
- Chill: Place the cake pops in the fridge for about 30 minutes, or until firm.
- Melt Candy Coating: While they chill, melt the candy melts in the microwave according to package instructions. Stir until smooth and no lumps remain.
- Dip the Cake Pops: Take each cake pop, dip it into the melted candy coating, and let the excess drip off.
- Add Decorations: Quickly add your decorations before the coating sets. Use the mini chocolate chips for eyes, add a little orange candy for the carrot nose, and sprinkle for a snowy effect.
- Let Them Set: Place the finished cake pops in a styrofoam block or a piece of cardboard to allow them to set completely.
Serving Suggestions
Snowman Cake Pops are not just for the dessert table. They can be a fantastic centerpiece for your holiday gatherings! Display them in cute containers decorated with festive ribbons or place them in a decorative box as gifts for friends and family. You might even serve them at a winter-themed party alongside hot cocoa or spiced cider for a cozy vibe. Don’t forget to snap some cute photos because these little snowmen are just too adorable!

Tips for the Perfect Snowman Cake Pops
- Chill Your Pops: Making sure the cake pops are firm before dipping can prevent them from falling off the stick.
- Experiment with Flavors: Feel free to try different cake flavors and frostings. Red velvet with cream cheese frosting? Yes, please!
- Be Creative: Use different decorations to give each snowman a personality. Scarves made from fruit leather or pretzels can be adorable additions.
- Work in Batches: If you’re making a large batch, work in smaller groups to keep things manageable and organized.
Q&A Section
Can I Use Store-Bought Cake Mix?
Absolutely! Store-bought cake mix is a great time-saver. You can make these Snowman Cake Pops with ease.
How Long Do They Last?
If stored in an airtight container, they can last up to a week at room temperature!
Can I Make Them Ahead of Time?
Yes, you can prepare the cake pop mixture and form the balls a day in advance. Just make sure to store them in the fridge.
What Other Decorations Can I Use?
You could use different candies, chocolate drizzle, or even edible markers to create your snowman’s features. Get creative!
Why You’ll Adore These Snowman Cake Pops
These Snowman Cake Pops are like little bundles of joy! They are fun to make, delicious to eat, and bring smiles to both kids and adults alike. The soft, moist cake combined with the sweet outer coating makes them a perfect treat for any winter celebration. Plus, the decorating part is genuinely an expression of creativity – each snowman can have its unique flair!
Behind The Scenes
Creating these Snowman Cake Pops was a delightful little project that left me giggling and reminiscing about childhood winters. On my first try, I misjudged how much frosting to mix in, creating a gooey mess! It took a few extra attempts, but with some adjustments, I managed to nail the consistency. I also ventured onto Pinterest for decoration ideas, and it led me to some fantastic inspiration! If you’re looking for more creative recipes, check out my Pinterest page at MyRecipeCast. It’s a treasure trove of culinary delights waiting for you!
Making Snowman Cake Pops can be one of the highlights of your winter kitchen adventures. So gather your ingredients, invite a friend or family member, and let the holiday fun begin! Happy baking!
Snowman Cake Pops
Ingredients
For the cake pops
- 1 box Cake mix Any flavor you love, vanilla or chocolate are classic choices.
- 2 large Eggs Can substitute with unsweetened applesauce or a flax egg for egg-free version.
- 1 cup Frosting Store-bought or homemade, cream cheese frosting is ideal.
- 1 bag Candy melts White chocolate or vanilla for a snowy look.
- 12 pieces Lollipop sticks Can use sturdy straws as an alternative.
- 1 cup Decorations Mini chocolate chips for eyes, orange candy bits for noses, decorative sugar or sprinkles.
Instructions
Preparation
- Prepare the cake mix according to package instructions or your homemade recipe. Once it’s baked, let it cool completely on a wire rack.
- Once the cake has cooled, crumble it in a large bowl until it resembles fine crumbs.
- Add a generous amount of frosting (about a cup) to the cake crumbs. Mix with your hands until combined. It should be moist but not overly sticky.
- Roll the mixture into small balls, creating a larger bottom ball and a smaller one for the head.
- Place lollipop sticks into the balls to hold them together.
- Chill the cake pops in the fridge for about 30 minutes, or until firm.
Decoration
- Melt the candy melts in the microwave according to package instructions. Stir until smooth and no lumps remain.
- Take each cake pop, dip it into the melted candy coating, and let the excess drip off.
- Quickly add your decorations before the coating sets: use mini chocolate chips for eyes, orange candy for the carrot nose, and sprinkles for a snowy effect.
- Place the finished cake pops in a styrofoam block or a piece of cardboard to allow them to set completely.